
Sunday
DIY Felt Tree
We have had so much fun this holiday season!! One of our favorite parts of story time this month has been playing with our felt christmas tree. Here is a template that can help you make your own!
Felt Tree Cut Out
Saturday
Thumbprint Art!
We had so much fun Signing and Crafting at the Jacksonville Mommies' Holiday Market! We have enjoyed making these adorable Rudolph Hopkins and Menorah Thumprint Crafts throughout the season. Now you can download print, color and craft them at home!!Thumprint Antler's for Rudolph Hopkins and Thumbprint Candle Light Menorah Printables
DIY: Holiday Crafting

I find that completing this entire project from begining to end is best suited children age 3 and up. However, with a little construction prep work ... it can be terrific fun for all ages and abilities. As with all craft activities children must be carefully supervised around choking hazard and other housholds dangers.
Happy Crafting!!
What you'll need:
- 6 colored craft sticks (popsicle sticks)
- White craft glue
- Glitter pens (or loose glitter)
- Other found objects (buttons, gems, glitter)
How to make the Star of David Shape:
- Apply a small drop of glue to the ends of three coloured Popsicle sticks and lay them on top of each other in the shape of a triangle. Repeat this process with three more sticks, so you have two identical triangles.
- Wait 15 to 20 minutes for the glue to set.
- Once your triangles are dry and securely glued together, lay one on top of the other in opposite directions so that they form a star.
- Put small dabs of white craft glue on the points that meet and gently hold them together to help set the glue.
- Wait another 15 minutes to make sure everything is dry and begin your decorations.
- Decorate and display on the table, mantel or windowsill. !!
How to make the Snowflake Shape:
- Apply a small drop of glue to the middle section of three coloured Popsicle sticks and lay them on top of each other in the shape of an astrick.
- Wait 15 to 20 minutes for the glue to set.
- Decorate and display on the table, mantel or windowsill!!
Decorating Tips:
- Use glitter pens or white glue and sparkles, buttons or little gems. add some personal touches!
- If you can’t find colored Popsicle sticks, paint your own using washable acrylic paint.
- If have a little under three consider completeing the construction portion of this activity for your little one. Allow it to dry completely and let them paint the stars or snowflakes with baby friendly finger paints!
For a different look, decorate both sides of your Star of Davids or Snowflakes and, using long pieces of fishing wire or colour ribbon, hang them over your table from your light fixture so they look like twinkling stars in the sky!!
Thursday
Multi-Age Learning Environments ...
 |
| I had to use a bit of humour in this photo. Of coarse, they are both students. But watching the response from our littlest sprout & growing confidence on one of our medium size sprouts highlights the power of multi-age learning at work! |
In my opinion, I see some of the most sustained and independent results from sprouts who participate in our multi-age learning activites either in our classrooms or at playgroup. One off the most compelling studies I have read on multi-age learning groups was written by Dr. Patricia Porter. She higlighted 5 benefit areas that I have seen living, breathing and working in our multi age environments. I think they are best presented the way she did so take a look at this excerpt.
Benefits of multi-age learning environments ...
 |
| We use work space levels to help older sprouts. Maintain independence while still inspiring younger sprouts! |
- "Children learn from each other and older children can help younger children learn while benefiting their own learning. Teaching is a great way to learn."
- "Multi-age classrooms encourage responsibility for learning. Children are encouraged to explore and challenge their own abilities in areas like problem solving, teamwork, and cooperation."
- "Friendships - Children can make friends with older or younger children depending on their maturity. Our society requires us to interact across age levels. From a social perspective the older child learns compassion and patience for younger students and the younger children are challenged and inspired by the skills off the older students."
- Sense of security - children feel less threatened by change and are able to concentrate more on learning in multi-age environments."
 The mulit-age approach does come along with a few challenges. You should expect that the multi age class is going to be a "busy" class. There is, in fact, a lot going on! This is why we limit class size to ensure that we can keep everyone having fun and moving forward. Sometimes the busy nature of our class means it gets louder than a single age group class. But it is just as likely to get so quite you can hear a pin drop due to the laser focus of our little sprouts.. Because we have children working at different maturity and skill levels 3 children working on the same project may be working on entirely different skill sets. A baby working on our craft project might simply be enjoying the tactile experience of finger painting her thumbprint, while the toddler is focused on placing those thumbprints perfectly on her project, and the pre-k sprout is working on all of that and his writing or pre-writing skills. Our multi-age class encourages independence and cooperation which is awesome. We are helping our littles to understand how to make space to accomplish thier goals while working as a part of team to learn larger lessons.
 One of the questions I hear parents asking each other far more frequently in single age classes is "How old is she or he?" shortly after a child does some absolutely adorable signing or displays a skill set we are focusing on with ease. It is often followed by, "So exactly how many months?" As a mom ... I totally get it. It's hard not to want to grab for a measuring stick to evaluate and assess where our littles are on the learning curve. Every parent wants to see their little be successful. However, there has been a ton of research that shows searching for assesment to early doesn't just stress out mom and dad - it can also intimidate littles. The purpose of our class is to have fun, learn and play together! So no matter which learning environment you choose remember your priority at any sprout event is to enjoy fun learning time with your little. We will work on goals and targets together individually after class ... learning time is play time!

We look forward to signing and PLAYING with you and your sprout soon!!
DIY: Holiday Craft Stick Puzzle.

As always please remember to only use child safe products when constucting any DIY project and be sure to only allow your child to play with this or any other toy under your careful supervision. These puzzles should not be mouthed, children are always at risk for choking. Only you know the ability and tedencies of your child. You are playing at your own risk so play wisely and HAVE FUN!
Click this link to download or print your free copy: Holiday Craft Stick Puzzle
Tuesday

Friday
Fall Hand-y Craft Trees
We had so much fun on our field trip this week. A big thank you to our Outdoor Adventure Captain Krista for planning such an amazing excursion into nature! After our hike we collected leaves and painted these fun Hand-y Craft Trees. Here is how you can do it at home:

Wednesday

Friday

October 2012

 Check out 3 of the signs we will be using at this months storytime! For a copy of our songsheet head to www.facebook.com/SignandShineJax
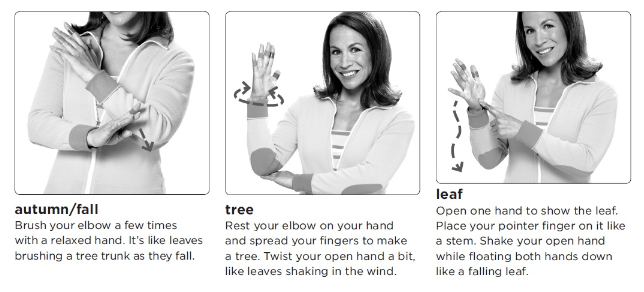

Halloween is around the corner!
 Are you ready for trick or treating? Check out these great saftey tips!! Join us for our October Library Story Time to learn a few fun ways to say trick or treat! My favorite choice for our younger sprouts is to say "candy" "please". :) Check out rachel showing off both signs. And for even more fun halloween signs ... check out Rachel's Halloween Video Clip Here

Saturday

As a young girl, I loved running around the playground at school with my friend, Paige, using our own secret language without making a sound. What I didn’t realize at the time was that “our secret language”, American Sign Language (ASL), didn’t belong just to us, but it was a living language that enabled communication for many people. Paige was profoundly deaf but in our school was predominately required to read lips and vocalize, so learning sign with her was mostly a recreational activity. As I grew up my relationship with ASL did as well. I studied the language in both High School and College and found it to be a remarkably useful tool when I ventured into the business world.
When I became a mom I knew I wanted to teach my children sign language. My personal experience with ASL, taught me some valuable lessons. First, ASL is fun for children of all ages. It’s just “a good time” to talk with your hands! Second, being committed to teaching children true ASL can benefit them for a lifetime! ASL is a real, living language, not just gestures that will only serve them for a finite period of time. I wasn’t, however, sure at what age I would start.
I learned to sign around age 7. I had read a lot of research that supported signing with children much earlier, but, I was skeptical to start too early. Partially, based on some unfounded fears that using Sign Language with my hearing little ones might delay their speech and because I just wasn’t sure it would work in ones so young. After speaking with my pediatrician, a speech therapist or two, and some early education professionals, I was convinced signing with babies and toddlers was not only not detrimental but was beneficial.
I was disheartened to discover that most programs, even those that profess to use ASL, often used adapted signs or simply used made up gestures. From my perspective, neither option was an acceptable approach. So I started signing on my own with my baby around 3 months old by the time he was 6 months he was signing words like eat and banana. Around that same time, I found and early education curriculum that did use true ASL, Signing Time. I became a certified instructor and my little one’s signing and verbal vocabulary exploded. I have been excited to watch his signs grow rapidly from basic needs like food and water to him now excitedly pointing out the color of a flower or telling me and showing me with his signs what games are his favorite!
My tips for families thinking of signing with their babies ...
1. Prepare to feel silly! When you sign to your baby especially if they are around 3 months you will feel silly. Embrace it. Signing with your little one is great bonding/playtime. Be sure to keep your signs close to your face to help them focus not just on your hands but on your expressions.
2. Connect with others! Be sure you join and stay active in our sunshine sprouts meet up group! Hanging out with othe familes that are signing with their little ones is awesome. As your child grows nothing is more beneficial than being around other children who sign. Plus, being around other parents that sign gives you a great sounding board for concerns and progress.
3. It’s a marathon not a sprint! Learning to sign takes time for you and your little one. Build your vocabulary and your child’s vocabulary slowly. Start with just a few signs around mealtimes, bath time, or diaper changes. Make sure that you incorporate them consistently and that you are having fun!
4. Go the distance! Don’t be discouraged if you child doesn’t sign back immediately. Some children begin signing back very quickly while others may take 6 months or longer.
5. Curriculum Matters! If you elect to take sign language class look for curriculum that uses non-adapted ASL exclusively not just most of the time. I recommend going through the Signing Time Academy to locate a class near year.
6. Don’t be afraid to go it alone! If you can’t find a make it to class for some reason, you can get started on your own. There are some great resources out there to help you. Signing Savvy is a great online tool to access free ASL vocabulary demos. Also, check out the awesome new Sign 2 Learn program!
Subscribe to:
Comments (Atom)
